Building a Smart Camper Van Electrical System | Custom Solutions
🧠 Introduction
When looking at touchscreen solutions for smart camper van systems, it's tempting to pick a board that combines everything — like the ESP32-S3 Development Board with 4.3” Capacitive Touch LCD from The Pi Hut.
But how well does it actually fit into a smart camper van electrical setup — especially one powered by Home Assistant?
Here’s everything you need to know — the good, the bad, and what to do (and avoid).
🔍 What This Device Is
This board includes:
- ESP32-S3 microcontroller (Wi-Fi + Bluetooth)
- 4.3" capacitive touchscreen (800×480)
- USB-C port for power/programming
- GPIO pins for sensors/relays
It’s designed to run ESPHome, Arduino, or other firmware — but it is not a general-purpose tablet.


✅ How It Can Work in a Camper Van System
✔️ Smart ESPHome Sensor Hub
- Read sensor data (voltage, current, temperature)
- Drive relays to control devices (pumps, lights, fans)
- Send data to Home Assistant via Wi-Fi
✔️ Minimalist Wall-Mounted Control Panel
- Show real-time voltage, current, temps
- Add touch buttons for simple controls (e.g., toggle water pump)
❌ Where It Falls Short
✘ Doesn’t Run Home Assistant UI
- Doesn't support a web browser
- Can’t install the Home Assistant app
You’d need to manually code a basic interface in ESPHome.
✘ Requires YAML + Display Programming
- Write and maintain ESPHome YAML files
- Understand how to design layouts with limited tools (text, icons, buttons)
✘ Power & Space Considerations
- Slightly higher power draw than basic ESP32s
- Not ideal if you're trying to conserve every watt-hour in your van
✅ DO’s and ❌ DON’Ts
✅ DO:
- Use it as a smart sensor/control node
- Wire it to relays or sensors (e.g., INA219, DS18B20)
- Power it from your 12V system using a USB step-down converter
- Flash it with ESPHome and send sensor data to Home Assistant
❌ DON’T:
- Expect it to replace a tablet or Raspberry Pi screen
- Buy it if you don’t want to write code or build a custom interface
- Use it as your primary dashboard display
💡 Better Alternatives for Full Home Assistant Dashboards
| Device | Best For | Why Use It Instead? |
|---|---|---|
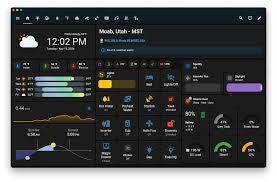
| iPad | Full Home Assistant display | Easy setup, app/browser support |
| Android Tablet | Budget-friendly dashboard | Customizable, kiosk mode available |
| Raspberry Pi + 7” Touchscreen | Power users | Runs full Linux + browser + HA access |
🧠 Final Summary
Can the ESP32-S3 with 4.3” LCD be used in a camper van system with Home Assistant?
Yes — but only as a smart sensor and control device, not a full display interface.
✅ Use Case Recommendations
| Use Case | Should You Use This Board? |
|---|---|
| Monitor battery/solar via ESPHome | ✅ Yes |
| Control devices (relays) via Home Assistant | ✅ Yes |
| Display full Home Assistant dashboard | ❌ No |
| Use as touchscreen Home Assistant UI | ❌ No |
| Replace tablet/iPad for HA access | ❌ No |
📦 Final Setup Recommendation
| Component | Role |
|---|---|
| ESP32 | Monitor battery, control relays |
| iPad/Tablet | Display Home Assistant dashboard |
| Home Assistant | Brains of the system |
| Solar & Battery | Power and charging backbone |
✅ Your ESP32s feed data to Home Assistant.
✅ Your Home Assistant displays that data on your iPad or mounted tablet.
✅ You get a clean, smart, DIY system — without the Victron price tag.
🔗 Learn from the Experts Who Inspired Us
Looking to dive deeper into ESP32, Home Assistant, and safe 12V van electrics?
📚 This guide shares the resources and experts we've learned from while building our own smart camper van systems.
👉 Explore the Smarty Van Reading Guide →
👉 Explore Our Further Reading Guide →
Note: These are not our own tutorials, but trusted resources we've used and recommend.

